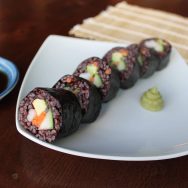
Black Rice Sushi
- Gluten-Free
- Dairy-Free
- Pescatarian
This maki sushi is made healthier by using black rice instead of the traditional white variety. It's gluten-free, dairy-free, soy-free, and 100% delicious!
Servings: 6 rolls
Ingredients
- 2 cups black rice
- 3 1/2 cups water
- 1 cucumber
- 1 avocado
- 1 cup shredded carrots
- 3/4 lb cooked shrimp thinly sliced
- 1/3 cup rice vinegar + 1 tbsp for coating avocado
- 10 stevia drops
- 1 tbsp salt
- 6 sheets nori
- coconut aminos for dipping optional
- wasabi optional
Instructions
- Prepare rice according to the instructions on the package. The ratio of rice to water may vary from brand to brand so make sure you follow the instructions for the brand you choose. Generally, you'll want to bring the rice and water to a boil in a medium-sized saucepan then reduce to a simmer, cover with the lid, and let it bubble away for 35-45 mins. No peeking! You want to keep all of the steam in the pot to help it cook correctly. Once you get to the 35 minute mark, remove the lid to see if all the water is absorbed. If so, stir the pot, replace the lid, remove it from the burner, and let it sit for 5 minutes. If there is still water left in the pot, let it simmer (covered) until the water is absorbed then stir and let it rest for 5 minutes.
- Transfer the prepared rice to a large mixing bowl. Let it cool completely. If you're in a hurry you can gently fluff/stir the rice using a wooden rice spoon or a heat-safe spatula and fan the rice. Sometimes I just stick it in the freezer for 5 minute intervals (stirring in between) until it's cooled.
- While the rice is cooling, you can prep your veggies.
- Slice your cucumber in half lengthwise and remove the seeds with a spoon by gently scraping from one end to the other. Next, slice the cucumber into thin strips (approx. 1/4 inch wide). Each strip should have a little bit of the green peel on it.
- Cut your avocado in half, remove the pit, then slice flesh into thin strips within the skin (without cutting through the skin). I just hold the avocado half in one hand and slice it with a paring knife. Now use a metal spoon to separate the skin from the flesh. Since you won't be using the avocado immediately, gently rub the exposed surfaces with a bit of rice vinegar to prevent them from oxidizing and turning brown (yuck!).
- Now you'll want to do as the Japanese do and assemble your sushi station. I like to neatly lay out all of the fillings (in this case, cucumber, avocado, carrots, and shrimp) on a big cutting board. Then on a clean countertop or table make a stack of nori sheets, prep your sushi roller by covering it in plastic wrap (or not, just more clean-up) and place it next to the nori, and finally grab a small bowl of warm water and a kitchen towel (for your fingers*). Now your station is ready!
- In a small mixing bowl, combine the rice vinegar, stevia, and salt until the salt is dissolved. Pour the mixture over the cooled rice and stir to coat the rice in the mixture. As you stir, use the spoon to mash the rice a bit until it starts to stick together like traditional sticky white rice.
- Add the bowl of rice to your station and you're ready to rock and roll! Literally! Let's roll up the sushi!
- Place a sheet of nori shiny side down on your sushi roller with the lines facing vertically.
- Take 2/3 cup of rice and gently spread it onto the nori with a spoon or your fingers. Cover all but the top 2 inches of the nori. You'll need this space to help seal up the roll! If you're using your fingers to spread the rice, dip them in the warm water to prevent sticking and use the kitchen towel to dab your fingers as needed.
- Place your fillings in a horizontal line across the nori starting about 1 inch from the bottom of the sheet. If you're just learning to roll sushi, less is more here. Too much filling and you'll have a giant mess on your hands. Let's avoid that :) You want a little bit of everything to end up in each bite, so try to make sure each ingredient is present along the length of the sheet.
- Now it's time to roll! It may take a little practice, but don't get discouraged! Using the sushi roller as your guide, lift the bottom edge of the nori and wrap it up and around the fillings. Now gently squeeze the roll toward your body. This is where the roller comes in handy. Don't squeeze too hard or the fillings may pop out of the end, but do make sure the roll is tight to prevent it from falling apart once you cut it! Now, continue to roll it up while tucking and squeezing the roll to keep it tight. You're almost done! Right before you reach the top of the sheet, dab a finger in the warm water and run it along the top of the sheet. This will help it stick. It might take a few dabs of water. Now roll it all the way up to the top and use the roller to gently squeeze and shape the sushi roll into a nice cylinder shape.
- Remove the roll to a cutting board. You can either cut each roll as you make them or leave the cutting to the end and do all of the rolls at once. I like to cut them all at the end.
- To cut the rolls, use a very sharp knife and dab it with your warm water on both sides. This will prevent the knife from sticking as you cut through the roll. Now slice the roll into 8 even slices, rewetting the knife as needed.
- That's it! *As you work, your hands will get pretty messy. So, whenever they get a little crazy, just dip in the bowl of water and dry them on the kitchen towel. This makes it so much easier!